How to Install Windows XP on a SATA Drive without access to a Floppy Disk Drive
Install Windows XP on a SATA Drive
 SATA drives have now become very popular as they offer a speed increase over the older IDE technology. As a result, nearly all the computers sold today will have SATA drives fitted as standard.
However, there are also many people who have older computers and motherboards and who wish to install Windows XP onto a new SATA drive. For many this can turn out to be very problematic as Windows XP does not provide drivers for all the different SATA controllers that are available.
If you have a working copy of Windows XP and your motherboard supports SATA technology and you just wish to add a SATA drive to the set up, chances are you may have a driver CD which you can use to load the appropriate SATA driver before you install the drive itself. But this is not always the case. Many older PC's were supplied with a recovery CD and a floppy disc containing the SATA driver. And what if your PC does not have a floppy disc installed?
If you try to load any flavour of Windows XP onto a new SATA drive you will be asked, during the installation process, to insert a floppy disc containing the SATA drivers. These are normally enclosed in the package containing a new motherboard or were enclosed with all the paperwork you received when first buying your new computer.
If you do not have a floppy disc drive and have no SATA drivers or have these SATA drivers on a CD or DVD then you are in trouble, because when the Windows XP installation asks for a floppy disc containing the SATA driver it will not let you search for the appropriate drivers on another medium such as another hard drive, a CD/DVD or flash drive - it has to be a floppy disc!
With no floppy disc installed in your PC it's virtually impossible to install Windows XP on a SATA Drive (especially on some older mother boards). The Windows XP installation simply won't detect the SATA Drive so will halt the installation process, shortly after it starts.
You could of course buy a floppy drive, copy your SATA drivers from your CD to a floppy disc (perhaps using a friends PC if you don't have a working copy of Windows XP). However a floppy drive is old technology and you would probably never use it again.
A better solution is to create a new Windows installation disc containing the necessary SATA driver and any other drivers you might need (you may have to use another Windows XP based PC, perhaps owned by one of your friends, to complete this exercise).
To produce a new windows installation disc, you need a genuine copy of Windows XP (any version), a freeware application named NLite and a blank CD/DVD. You also need the original drivers for the SATA controller provided by your motherboards manufacturer. If you can't find them on the motherboards installation CD, or the Drivers CD that might have come with your PC, you will need to download the SATA driver that exactly matches your motherboard from the manufacturer's website.
To determine what driver to download you will need to open your PC's case and inspect the motherboard. There should be a model number somewhere on the motherboard's top surface. For example a recent MSI motherboard had the model number 865PE Neo2-P. You need to take a note of this and then go to the motherboard's manufacturers website to search for the right driver download.
If you have to download the drivers save these to a named
'Driver' folder on your desktop so you can easily find them when you need to (You may need to unzip the driver before saving it).
Also create another destination folder to contain all the files that will be used to create your new installation package. Perhaps give it a name like 'Installation CD'.
Install the Nlite Application
Now download and install the Nlite application from this link- www.softpedia.com/get/System/OS-Enhancements/nLite.shtml.
 When you start the Nlite application, you will be asked to provide the location for the Windows installation package. Insert your Windows Installation CD into your CD drive and, inside the application, select the CD drive letter.
Select the destination folder ('Installation CD') for all the Windows files to be saved. Make sure that the destination drive has enough space to store the contents of the installation CD.
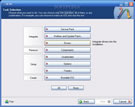
 Now, click next twice until you get to a screen where you get options sorted in 4 categories: Integrate, Remove, Setup, Create. We are interested in the integration procedure, so select the Drivers button and click next. From the next menu, click Insert and select multiple drive folder option from the drop down
  menu. This option permits you to browse to the location where the downloaded SATA drivers have been saved.
Select the 'Driver' folder containing your downloaded driver (hopefully on your desktop) and click next. You will get a list with the available drivers, or simply one driver.
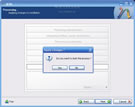
 Select the correct driver and click next. Now the application will ask for the permission to start the integration procedure.
Choose Yes and wait for the drivers to be inserted into the installation package.
 With the problematic driver now included in the Windows installation package you can now install Windows XP on your SATA Drive, but to do this you need to create a bootable CD .
To turn the newly created Installation Package into a bootable disk image use the same Nlite application.
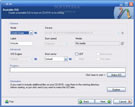
 Open it and make sure the 'Installation CD' folder is selected and click next. Select "Last session" preset and click next again. Now from the options menu choose Bootable ISO and click next. In the following window, make sure that the mode is set to "Create Image" and click Make ISO. A
  destination folder is required where the resulting ISO image will be saved (create one on your desktop). Once the image saving process is finished it will display some version information regarding the newly copied Windows Installation Package. You can now burn the ISO file to a blank CD using whatever CD burner software you prefer.
The new CD will be the twin copy of the Windows Installation CD but with one difference - it now includes the SATA driver (and any other drivers you might have added) needed to fully complete the Windows installation process.
NOTE: To see larger images of the Nlite program just click the appropriate image.
Read more articles about PC repairs, Web design & SEO
