If you have installed a PC network in your home using either network cabling or wireless technology, or a combination of both, you can easily share one or more printers across that network.
To get all the desktop and laptop computers on your network to use a specific printer you first have to set up "Windows File and Printer Sharing" on whatever Windows Operating system you are using.
You can even install two or more printers on one PC as long as the PC has sufficient ports (printer ports and/or USB ports). For example, one printer could use the standard printer port and the other could use one of the free USB connections. Both of these printers could then be shared across your home network.
The first thing to do is tell Windows that the printer(s) attached to the main PC should be shared with other network users.
If You Use Windows 98/ME
Choose Start, Settings, Control Panel and then double click the Network icon (you can also right click Network Neighbourhood and choose Properties).
In the window that appears, make sure the Configuration tab is selected. If you do not see the Network icon, click on the "view all Control Panel options" link on the left side of the window.
In "The following network components are installed:" section, you should see "File and printer sharing for Microsoft Networks" listed.
If not, click the Add button and select Service and then click Add. Select "File and printer sharing for Microsoft Networks" and click OK.
In the same window, click on the File and Print Sharing button. In the dialog box that appears, check the box next to "I want to be able to allow others to print to my printer(s)"

If you want to share your files as well also check the box "I want to be able to give others access to my files". This may already be ticked.
Click OK, then OK again. You must restart your PC to put these settings into effect.
Windows Printer Sharing (and File Sharing if selected) is now available on this computer.
In Windows 2000 and Windows XP
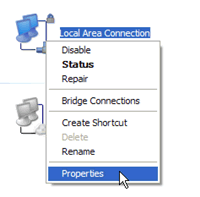
 Choose Start, Control Panel and double click Network Connections. Now right click the Local Area Connection and choose Properties.
Click the File and Printer Sharing for Microsoft Networks check box and put a check mark in the box. Now click OK. You do not have to restart your computer with these operating systems.
Physically Sharing the Printer(s)
Open your Printers folder. An icon for each of the printers you have installed are displayed in this folder. Right click the icon for the printer you want to share and choose Printer Properties. The Printers Properties dialog box opens and the sharing tab appears in the foreground. Select the option to 'Share this printer' (note the wording of this option slightly differs depending on the version of Windows you are using. This is the Windows XP version).
 Now type a name for the printer in the Share name text box. You can accept any name that Windows automatically enters, which is usually a shortened form of the printer models name. Or you can use a name of your own choosing e.g. 'Printer1' or 'Dads' or 'HP Photosmart'. Do not leave any spaces between the words.
In Windows 98 and ME, optionally type a description in the comment text box.
Click OK.
You are now returned to the Printers folder and your shared printer icon now has a hand under it. This indicates that the printer attached to this computer is now a shared resource across your network.
Now you can give the other computers in the network access to the shared printer, but each computer must use the drivers for its own operating system (you may need to download these).
First, make sure the shared printer and the PC it's attached to are switched on.
Now go to each computer that you want to connect the shared printer to and follow these instructions:
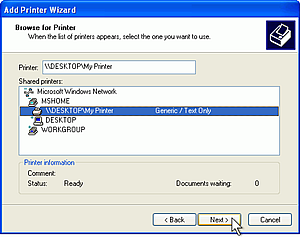
Open your Printers folder. Start the Add Printers wizard just as though you were about to add a stand alone printer to this machine. But choose the option to add "A network printer, or a printer attached to another computer," and then browse your network to find the shared printer and select it.

You may need to double-click to expand the computer name and display its printers. Select the shared printer and click Next. Disregard the warning that displays and click Yes and Finish. The shared printer should now be available on this computer.

When you've added the shared printer to each PC, you'll be able to print to the shared printer from any desktop or laptop PC's connected to your network.
After you add the printer, test it by opening a document, selecting Print, and selecting the shared printer from the list of available printers. If the document does not print or if you experience other problems such as not finding the printer on the host computer, try the troubleshooting tips that follow.
If you cannot find the printer by using the 'browse' option as described above, you can find the location directly by using this method. Type \\(computername)\(printername) into the 'connect to this printer' or 'network path' box. Where 'computername' is the name of the system attached to the printer (find this by right clicking on 'my computer,' selecting 'properties' then the 'computer name' tab) and 'printername' is the name you gave the printer when you shared it.
For example, if your printer was 'deskjet' and your computer name was 'blue,' type \\blue\deskjet into the search field. Once you have located the printer on the network (and installed any necessary drivers) you are ready to test it. Go into the properties of the printer and print a test page. If everything works, you are done.
If you are trying to use a printer attached to a windows XP computer and the other networked PC's are running Windows 98 or ME then due to the user-based security of Windows XP, you may run into difficulties accessing your printer from other computers.
You can try clicking the 'additional drivers' button of the printers properties dialog box (see opposite) and choose the relevant operating system from the list offered. Once you click 'ok' you will be prompted for the location of the printer drivers on your system (its best to download these Windows 98, ME or 2000 drivers from the printer manufactures website before you try to set up a mixture of Windows operating systems sharing a single printer).
Of course, for you to maintain constant access to that printer, the computer it is attached to must be left on. If it is turned off, and you try to print, no computer on the network will be able to access it.