
 Adding a second CDRW/DVD drive is a great way to give your computer new capabilities without buying a completely new and expensive computer system. With multiple optical drives, your system will be able to burn and copy directly from one disc to another. This can be very handy when copying CD's or DVD's for safekeeping.
Another good reason for adding an extra CDRW/DVD drive is the cheapness of the upgrade. Typical prices for a CDRW/DVD are under £20. The only extra cost to install one of these optical drives is no more than the price of an IDE, E-IDE or SATA cable and perhaps some drive rails. So the expense is minimal compared with the price of other PC parts, like processors (CPU's) and Graphic Cards.
Even if your system already contains an optical drive or two, with most computers, you will not have any trouble in installing an extra one. As long as you have a spare drive bay and an available drive connector, your new drive should easily coexist with all your other drives.
Before you begin the installation, take a few moments to consider where you will place the additional drive. For example, moving the drive down a bay may make it easier to attach the correct shared connectors to the drives. As an added bonus it will also enable a good amount of air to flow between them.
TIP: Refer to your system's documentation if you have any doubt about how to install the new drive into a bay.
To install a new drive it will be necessary to remove a 5.25" drive slot cover from the front of your computers case. Removal of these panels is generally done by pushing some tabs either on the inside or the outside of the case. Some may even be screwed into the case. Whatever attachment you come across, remove the panel carefully, as you do not want to damage your PC's case.
With many people still using Windows XP its more than likely that the vast majority of drives use the IDE interface. This particular interface can have two devices on a single IDE ribbon cable.

But each device on the cable must be put into the appropriate mode.
One drive must be listed as the master and the other drive must be listed as a slave. These settings are usually handled by one or more jumpers on the back of the drive.
 The IDE ribbon cable will be marked down one side with a red or black strip, this denotes Pin 1, match this with the Pin 1 indicator on the back of the drive.
TIP: Consult the manufacturers documentation or diagrams on the drives for the location of these mode settings.
Place the drive rails onto the side of the new drive and fasten it with the screws, that might be provided. You may have to buy these drive rails or use any spares that you might find in your computers drive bays.
(beware that a lot of drives bought using the Internet do not come supplied with IDE cables, rails or screws - for this reason they are called 'bare drives'.)
Once the drive rails have been placed on both sides of the drive, slide the drive and rails into the appropriate slot in the case. Make sure to affix the drive rails so that the drive is flush with the case when it is fully inserted. When this is done, fasten the drive to the computer case by placing screws into the appropriate slots or holes in the case.
 The only other thing left to do for installing this new drive is to plug in its power supply. This is done by locating a spare 4-pin Molex connector from the power supply unit and inserting this into the power connector on the back of the drive. The power cable will only fit one way, so you cannot put it in the wrong way round.
Now double check all your connections, and make sure the devices on th IDE ribbon cable are correctly set as master or slave.
Note: If your new drive is going to reside on its own separate IDE ribbon cable, the drive should be set to the Master mode.
Once you have successfully installed the new drive and are sure that the jumpers are properly set, close your computers case, plug in the mains power cable and switch on.
When you reboot your machine the BIOS should automatically detect the new drive. If you are using the Windows Operating System, go to My Computer and you should see your new drive sitting there. The letter assigned to the drive will depend on your machine's configuration.
Since CDRW and DVD drives are very standardised, it should not be necessary to install any specific drivers.
Watch out if you buy a drive that uses the Enhanced IDE Interface. The cable to fit a E-IDE based drive has 80 cores, whereas the older IDE cables have only 40 cores, so you will have to buy an E-IDE cable to make this drive work effectively. If you need an E-IDE cable it may be best to buy it online.
At the moment, IDE still dominates the market place rather than E-IDE, so many of the drives you purchase will still need an ordinary IDE cable sporting just 40 cores.
Serial ATA, or SATA Drives and connections are replacing IDE ribbon cables. SATA cables transfer data anywhere from 1.3 GB per second (1st Generation) to 3.0 GB per second (2nd Generation) to 6.0 GB per second (3rd Generation).
Even with the most common SATA hard disk drives transferring at 3.0 GB per second this is still 22 times faster than a basic IDE ribbon cable. This is why SATA Drives and connections will ultimately replace IDE technology completely.
 SATA cables are much smaller than IDE ribbon cables. The data connectors have only 7 pins with a notch on one end, so the connector will only go into the drive interface one way.
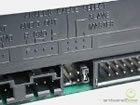
There should be one SATA cable per drive to one SATA socket on the motherboard. Take a look at your motherboards documentation and look for your SATA connectors. These should be labeled SATA1, SATA2, SATA3, etc.
Your main C: Drive, the one with the Windows Operating System installed should be connected to SATA1. Other drives can be plugged in to SATA2, SATA 3 etc.
Attach the SATA cable to your new SATA drive and plug the other end of the cable into the SATA connector on your motherboard.
 Now plug the SATA power cable into the back of your new drive. This is a 15-pin slim connector with an L-shaped notch on the end, so you can’t hook it up the wrong way round. Make sure you push the power cable in tight.
You will need one SATA power connector per drive - one power cable usually has two power connectors.
Now close your computers case, plug in the mains power cable and switch on. Check My Computer and you should see your new SATA drive sitting there.
Read more articles about PC repairs, Web design & SEO