
 If you are planning to replace your motherboard, one of the first things to do is back up your computer system. It's best to back up your valuable data onto an external drive first. Then, if possible, also make an image backup of your entire hard drive, using a tool such as Paragon Backup and Recovery.
Before installing the new Motherboard their are a few vital steps you must undertake
Take a close look at all the software you're running. Most modern applications require a registration key to be entered before you can use the software. You may have to re-enter those keys once your new motherboard is installed, so make sure that you have them to hand, preferably a paper copy or the software's original printed registration key.
If you have a lot of programs, grab Magical Jelly Bean Keyfinder it will search and collect all of your registration keys so that you can easily record them.
If an application requires activation, it may see a new motherboard as an attempt to copy the software illegally and it may refuse to run as a result. For example, the Adobe Professional Applications we use as part of CS5 , Photoshop, Dreamweaver, Fireworks and illustrator, always require activation. However, they also have a handy 'Deactivate' button in the Help menu. If you're running an Adobe suite (CS3 or later), you only need to deactivate one of the applications to take care of the whole lot; but if you've installed individual programs, you'll have to deactivate those one by one.
Some modern games will also require deactivation or uninstalling if they've been activated.
Whatever the application, if it has gone through an activation process, and most software does these days, you need to be prepared to reactivate it when you're installing a new motherboard. You may even need to reactivate your copy of Microsoft Windows. So make sure you have all your activation keys handy. For a quick way to detect them, see the link above for Magical Jelly Bean Keyfinder.
This step is particularly useful if you're moving from an older Intel chipset to a newer one (or from an older AMD chipset to a more recent one).
It's also a good time to update your graphics board's drivers and, if you have a separate sound card, your audio drivers.
If you're using a motherboard's integrated audio, you will obviously be installing those drivers after the upgrade using the CD/DVD that came with the new motherboard.
First, carefully check your disk-interface settings. Migrating between chipset's from different computers can be problematic. For example, if you're moving from an nVidia chipset to an Intel one, you'll want to make sure that your PC isn't running any proprietary nVidia drivers. And if you move from Intel to nVidia make sure your computer isn't running any proprietary Intel drivers. If a mismatch occurs, you might experience a blue-screen error on the first boot - namely, the dreaded 'STOP 0x0000007' error, indicating that the disk chipset is unrecognised.
If you're running RAID 1, you might want to revert to a single-volume setup until you get the system up and running.
If you're running RAID 0, it's more complicated if the chipset manufacturers differ; you may have to re-image the volume to a single drive until after the installation. Moving from one Intel RAID generation to the next usually works without a hitch.
If you have a RAID 1 or RAID 0 secondary drive, you'll probably be okay - but back up before upgrading anyway. There's always the chance that the new system won't recognise your old RAID volume if you're using the motherboard chipset to handle RAID.
Find out more about Raid set ups.
If your machine is booting off an add-in disk-controller board (for instance, a PCI Express SAS or SCSI controller), you might not have a problem with the first boot, but there's no guarantee. You may have to perform a Windows repair which is possible if you are using either Windows XP or Windows 7. (Note: Windows Vista doesn't have a repair option).
If you are migrating between similar chipset's (old Intel to new Intel, for example) and are running Intel RAID or AHCI (Advanced Host Controller Interface) mode, update the Intel RAID drivers to the latest version.
Check your BIOS setting to be certain, and make sure your new motherboard's settings are the same before fully booting for the first time. For example, if you're running AHCI in the current arrangement, set your new motherboard to AHCI in the BIOS prior to your first system start.
There are other possibilities as well. And if you have an unusually complex setup, a clean install may be the only way to go.
 Find a good work space that's flat, dry, and free of static electricity.
Before you carry out any work on your computer make sure you protect your PC's delicate circuits from static electric charges on your body by properly grounding yourself. If you don't have a grounding strap at least ground your body by touching the metal part on the outside of your PC's case before touching the inside of your PC or any component, including the motherboard.
First, remove the old motherboard. You need to be careful when removing the CPU cooler and, in particular, the tiny connectors that run to the status LED's, as well as the power and reset buttons. In fact, make sure to disconnect all wiring and cables before you start pulling out the boards mounting screws. You'll probably want to remove the old memory and CPU, as well, storing them in appropriate, static-free containers or bags.
You'll need a number 2 Phillips screwdriver, and possibly some fine needle nose pliers. Once you've disconnected all the wiring, take out the mounting screws and set them aside, and then wiggle the motherboard out carefully. Store the board in an anti static envelope. Be sure to remove the ATX I/O plate, too. The ATX I/O Shield (input/output shield) is a metal plate located at the back of the chassis that provides openings for different I/O ports, (e.g. serial, parallel, PS/2 ports, USB. FireWire).
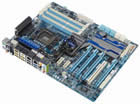
 Unpack the new motherboard. But before you drop into the case, check the standoffs that accept the mounting screws. Make sure they're installed - some may have come out when you removed the original board. Also confirm that they're properly aligned vertically.
Carefully install the new motherboard and do not over tighten the holding screws or you could damage the board even before you get a chance to use it!
Make sure you remove the CPU socket protector before proceeding with CPU installation. And don't forget to install the ATX I/O back plate, or you'll find yourself removing the motherboard to install it later.
Gently insert the CPU into the socket, confirming that the notches on the side of the CPU circuit board align with the tabs on the socket. Apply a thermal compound to your CPU before installing your heat sink (i.e. applying a few drops and spreading a thin layer across your CPU). Many stock heat sink/fans will come with a thermal pad affixed to the bottom of the heat sink (normally a soft gray substance), in which case you won't need any thermal compound.
Now all you need to do is lower your motherboard into the case, line it up with the brass standoffs and your I/O plate, and start screwing.
After you've installed the motherboard, CPU, memory, (and any cooler set up), it's time to attach all of the connectors.
Here are some of the basics you'll need to connect.
 Reconnect your IDE or Sata hard drives - both their power and motherboard connections.
The recent ATA ports are colour coded for use with 80 wire cables and auto selecting master/slave on ATA drives. If you have serial ATA (SATA) drives, it's even easier, just one slim data cable per drive.
Also install any PCI Express graphics card and make sure to attach any PCIe power connectors to the card (if needed).
Finally finish the job off with a few cable ties, which will neaten up the case a little and also encourage better air circulation through the case.
Your new motherboard's documentation will show you the layout for all these connections, so it's wise to consult that before proceeding with the setup.
Always go back and check all your connections before booting up your computer. It's so easy to forget something!
Once you've double-checked all the internal connections, you need to attach the external ones, namely the keyboard, mouse, network, and video cables.
Before you attempt to boot into Windows, get into the BIOS setup program by pressing F2 (Intel motherboards) or Del (most other motherboards). You want to check the boot order, particularly if you have more than one hard drive - you need to make sure that the Windows boot drive is the first drive the system sees. Most modern motherboards let you specify which SATA drive is the boot drive.
Once you're confident that the correct boot drive is specified, boot up the system.
Assuming you've connected everything properly, you should see the Windows boot screen. You'll then need to wait as Windows sets up all the new hardware.
After all the devices have been checked and the drivers updated, you'll need to reboot your PC again.
 After all the devices have been checked and the drivers updated, you'll need to reboot your PC again.
Once you've rebooted a second time, check to see if Windows thinks it needs to be activated. You may get a warning to this effect. If in doubt go to Control Panel and open up System and Security and look at the bottom of the page. Their you'll see an 'activate windows now' query, along with an expiration period.
Activating over the internet usually works just fine.
Depending on your set up you may have to resort to contacting Microsoft's activation hotline via telephone if activation over the internet is denied. This process takes only a few minutes and requires entering codes into fields. If the automated system asks you how many computers this copy of Windows is running on, make sure you answer '1'.
If you're moving from AMD to Intel or vice versa, or if the new motherboard uses a chipset from a different manufacturer than the old one, you will have to do a little more work.
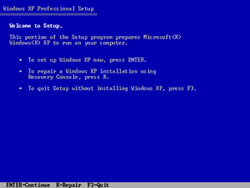
First, grab your Windows setup disc and your Windows CD key. If you're upgrading a Windows XP installation, boot from the Windows XP CD. Follow the normal instructions for installing Windows XP, but do not reformat or perform a clean install. Instead, follow the prompts for a repair install. What that will do is update the storage driver to one that Windows will recognise when it boots.
 This also works with Windows 7, using the 'Repair My System' option.
In both cases you'll need to re-enter the Windows registration key.
Windows Vista makes the process more painful as it has no repair option. What sometimes works is to boot the PC into safe mode, install the new storage drivers (from the motherboard maker's CD) and then proceed with the boot.
If that doesn't work, you will have to wipe your hard drive and perform a clean install, which is why backing up your system prior to an upgrade is so vital.
TIP - If you think your existing motherboard is starting to exhibit a few symptoms that point to failure, check out our motherboard problems page. To find out about Form Factors see this article - motherboard form factors.
Read more articles about PC repairs, Web design & SEO